
This blogpost is part of a series of Azure Virtual Datacenter Concept blog posts.
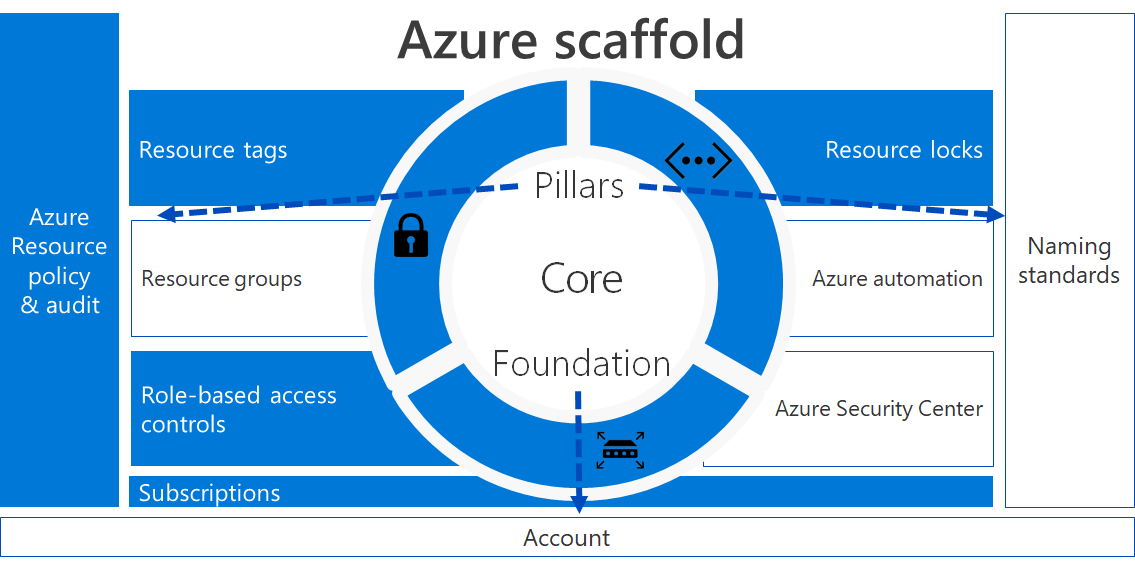
Today let’s focus on probably the most important pillar of the Azure Governance scaffold: Azure Governance.
We will talk about Azure Policies and auditing, resource tagging, managing subscriptions, locking down resources and role based access controls.
What’s it all about? Policies on Azure? And more!
As stated before, this is probably the most important pillar, so what is it exactly?
Azure Governance allows you to define the rules of play to all your subscriptions within your Azure AD tenant. As with typical on-premises scenario’s, you would deploy group policies within your Windows Server Active Directory estate in order to meet your corporate requirements and standards. And most of all to make sure you’re gaining a certain amount of control over your infrastructure.
So, comparable with group policies you say? Not exactly, with Azure Policies we can do so much more and on different levels.
Before we start deploying policies, we need some kind of hierarchy to which we can apply our policies. And as with traditional group policies, we needed organizational units to group our resources into logical containers.
Management Groups
A management group is a logical container that can have policies, blueprints and role based access controls applied. Subscriptions can be added to a management group, so they can inherit the settings that are being applied to a management group. Below example provided by Microsoft, shows you how you can organize management groups, subscriptions and resource groups per Business Unit, Geo-location and environment type.

When on-boarding your first subscription into your tenant, it will be added to your root management group.
Best practice is to create a management group attached to the root management group and start from there. As with group policies, you usually start with a new OU and apply policies on that level. You never start with changing the default domain policies.
The following powershell demonstrates how to create a very simple management group hierarchy.
Powershell script
###########
#
# Let us define our variables here
#
###########

$ParentGroupname = "Contoso_Management_Group"
$ITManagementGroupname = "IT_OPS_Management_Group"
$PRDManagementGroupname = "Production_Environment_Management_Group"
$DEVManagementGroupname = "Development_Environment_Management_Group"

###########
#
# Create the parent management group which is located just below the root management group
#
###########

$ParentGroup = New-AzManagementGroup -GroupName $ParentGroupname -DisplayName $ParentGroupname
$parentobject = Get-AzManagementGroup -GroupName $ParentGroupname
$ParentID = $ParentGroup.ParentId

###########
#
# Create the IT Operations management group as a member of the parent group
#
###########

$ITGroup = New-AzManagementGroup -GroupName $ITManagementGroupname -DisplayName $ITManagementGroupname -ParentObject $parentobject
$ITGroupObject = Get-AzManagementGroup -GroupName $ITManagementGroupname

###########
#
# Create the Production and Development management groups as a member of the IT Operations management group
#
###########

$PRDGroup = New-AzManagementGroup -GroupName $PRDManagementGroupname -DisplayName $PRDManagementGroupname -ParentObject $ITGroupObject
$DEVGroup = New-AzManagementGroup -GroupName $DEVManagementGroupname -DisplayName $DEVManagementGroupname -ParentObject $ITGroupObject


###########
#
# Move our subscriptions to the correct management group
#
###########

$PRDsubscription = Get-AzSubscription | where {$_.Name -eq "Azure IT Ops Prd"}
$DEVsubscription = Get-AzSubscription | where {$_.Name -eq "Azure IT OPS Dev"}


New-AzManagementGroupSubscription -GroupName $PRDGroup.Name -SubscriptionId $PRDsubscription.SubscriptionId
New-AzManagementGroupSubscription -GroupName $DEVGroup.Name -SubscriptionId $DEVsubscription.SubscriptionId

###########
#
# End of script
#
###########
Subscriptions
In the previous example, we’ve added our production and development subscription to a management group. By adding our subscriptions to a management group, we can start defining our rules of play at 2 levels.
- Top level: Management Group
- Sub level: Subscription
A subscription is a billing and management boundary to deploy your resources in and manage them via the right set of role based access controls.
Your subscription(s) are linked to your Azure AD tenant and can be made available to your Administrators by delegating permissions on a per subscriptions basis.
Our previous example provisioned a Production and Development subscription. With RBAC we can assign our developers the Contributor role to the Development subscription, so they can deploy and manage their resources. That same developer can only be granted a Read-Only role, to make sure no changes are being made on our production platform. If we really want to utilize the power of Azure we will deploy the roles on management group level, so every subscription in the PRD and DEV managemen group is inheriting the right set of roles and permissions.
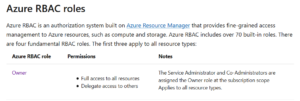
RBAC (Role Based Access Controls)
And yes, Role Based Access Control is exactly what is states. We are giving access to a set of resources based on the specific role a security principal has. A security principal can be one of the following.

Now how does this work in Azure? RBAC is applied at 2 levels.
- Azure Active Directory
- Azure Subscriptions or Management Groups
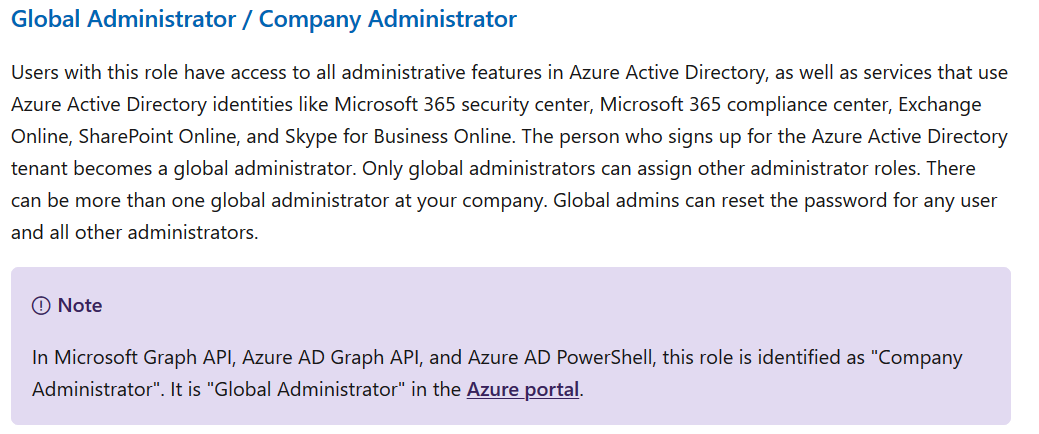
As an example, you can have a global administrator within your Azure Active Directory tenant. That global administrator will have the ability to perform everything within your Azure AD tenant. However, that same global administrator, doesn’t necessarily have the same amount of power within your Azure Subscriptions. Your Azure Subscriptions or Management Groups are using their own built-in roles. If you want your global administrator to have all the keys to the kingdom, you’ll have to grant him Subscription Owner rights within your Azure Subscription.
Below is an overview of the Global Administrator permissions.
Below is an overview of the Azure Owner permissions.
As an administrator, I would love to have the keys to the kingdom, for demo purposes, the below powershell script gives you an idea on how to assign the required roles to a user.
Best practice is to assign roles to a security principal based on the least privilege principle.
Powershell script (credits to Steve König for the password generator included in this script )
###########
#
# Connect to your Azure AD Tenant
#
###########

$MyAzureADTenant = Connect-AzureAD
$tenantname = $MyAzureADTenant.TenantDomain

###########
#
# Define our new admin user
#
###########

$DisplayName = "MyAdmin"
$MailNickName = "MyAdmin"
$CompanyName = "MyCompany"
$UPN = $MailNickName + "@" + $tenantname

###########
#
# Generate a new complex password
#
###########

function Get-RandomCharacters($length, $characters) {
    $random = 1..$length | ForEach-Object { Get-Random -Maximum $characters.length }
    $private:ofs=""
    return [String]$characters[$random]
}

function Scramble-String([string]$inputString){
    $characterArray = $inputString.ToCharArray()
    $scrambledStringArray = $characterArray | Get-Random -Count $characterArray.Length
    $outputString = -join $scrambledStringArray
    return $outputString
}

$password = Get-RandomCharacters -length 5 -characters 'abcdefghiklmnoprstuvwxyz'
$password += Get-RandomCharacters -length 1 -characters 'ABCDEFGHKLMNOPRSTUVWXYZ'
$password += Get-RandomCharacters -length 1 -characters '1234567890'
$password += Get-RandomCharacters -length 1 -characters '!"§$%&/()=?}][{@#*+'


$password = Scramble-String $password

###########
#
# Store the password in a password profile
#
###########


$PasswordProfile = New-Object -TypeName Microsoft.Open.AzureAD.Model.PasswordProfile
$PasswordProfile.Password = $Password

###########
#
# Create my new admin user
#
###########


New-AzureADUser -DisplayName $DisplayName -CompanyName $CompanyName -UserPrincipalName $UPN -AccountEnabled $true -PasswordProfile $PasswordProfile -MailNickName $MailNickName
$User = Get-AzureADUser -ObjectId $UPN

###########
#
# Assign the Azure AD Global Administrator Role
#
###########

$GlobalAdminRole = Get-AzureADDirectoryRole | Where-Object {$_.displayname -eq 'Company Administrator'}
Add-AzureADDirectoryRoleMember -ObjectId $GlobalAdminRole.ObjectId -RefObjectId $User.ObjectId

###########
#
# !!! Login with an account that has subcription owner permissions in order to add a new security principal to the role
# Grant permissions to my Azure Subscription within my Parent Management Group
#
###########

$MyAzureSubscriptionAccount = Login-AzAccount
$MyAzureSubscription = Get-azsubscription
New-AzRoleAssignment -SignInName $UPN -RoleDefinitionName "Owner" -Scope "/providers/Microsoft.Management/managementGroups/$($ParentGroupname)"


###########
#
# End of script
#
###########
Time for a small recap
Taking the above into account, we’ve made our environment ready with the following structure.
- Management Groups
- Subscriptions linked to our management groups
- Subscription Owner assigned with RBAC at Management Group level
Let’s continue, Resource Locks
Now that we have our management structure up and running, let’s see how we can make use of Azure Policy to start locking down our environment.
Locking down… sounds like a plan, so let’s look at Resource Locks.
Now what is a resource lock and how is it applied.
There are 2 types of resource locks:
- DoNotDelete – this will prevent deletion of your resources
- ReadOnly – this will prevent changes or updates to your resources
Where can this be applied?
- Subscription Level : Applies to all resource groups and resources
- Resource Group: Applied to all resources in that specific resource group
- Resource: Applied to a specific resource
When can this be applied?
You can apply a lock during the creation of the specific subscription, resource groups or resource. A lock can be applied via powershell or through the portal on existing resources. Or you can leverage Azure Policy to apply locks at scale.
Let us walk through the steps in order to make sure that a Delete lock is being applied to all of our resources.
Azure Policy
For the sake of this blogpost series, I won’t dig too deep into Azure Policies and how the policy structure is being assembled. My colleague @ThomasVanLaere has made a detailed blog-post on Azure Policy, make sure to check that one out as well.
We will make use of a predefined Azure Policy and let’s alter this one to meet our needs. What are our needs?
- Audit Subscriptions / Resource groups that don’t have a Delete Lock applied
- Remediate Subscriptions / Recource Groups so that a delete lock is applied
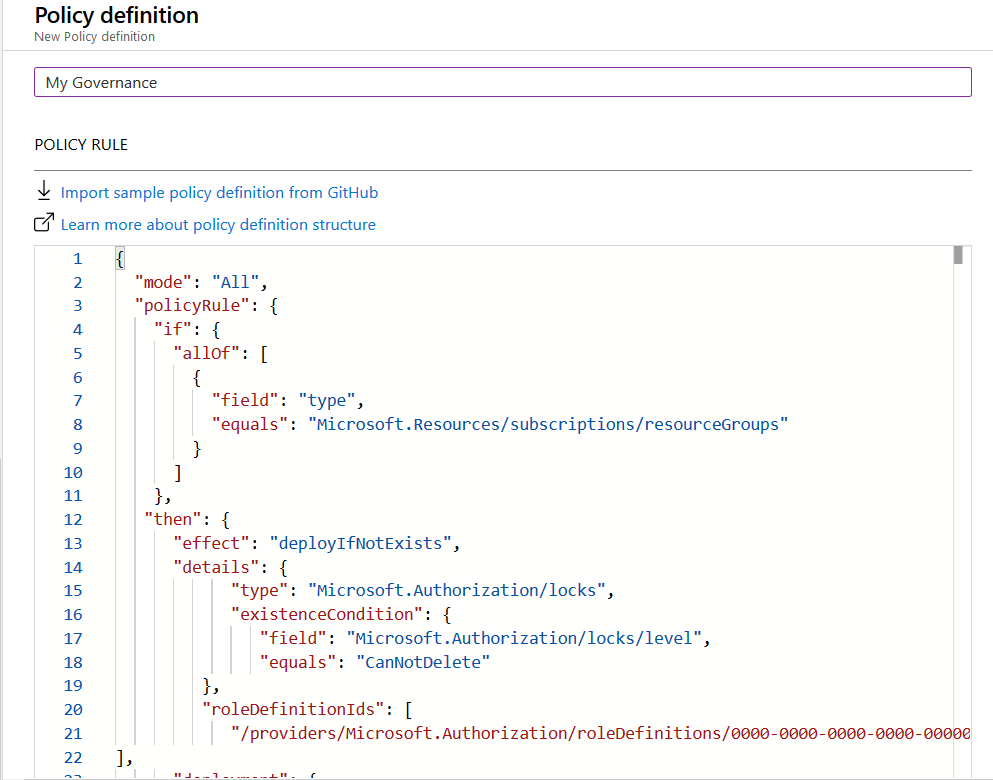
Below Policy Definition is exactly what we need to Audit and deploy is a resource lock is not available on our resource groups.
{
  "mode": "All",
  "policyRule": {
    "if": {
      "allOf": [
        {
          "field": "type",
          "equals": "Microsoft.Resources/subscriptions/resourceGroups"
        },
   "then": {
      "effect": "deployIfNotExists",
      "details": {
            "type": "Microsoft.Authorization/locks",
            "existenceCondition": {
               "field": "Microsoft.Authorization/locks/level",
               "equals": "CanNotDelete"
         },
         "roleDefinitionIds": [
            "/providers/Microsoft.Authorization/roleDefinitions/0000-0000-0000-0000-0000000"
],
      "deployment": {
         "properties": {
            "mode": "incremental",
            "template": {
               "$schema": "https://schema.management.azure.com/schemas/2015-01-01/deploymentTemplate.json",
               "contentVersion": "1.0.0.0",
               "parameters": {
                  "location": {
                     "type": "string"
                  }
               },
               "resources": [
                  {
                     "type": "Microsoft.Authorization/locks",
                     "apiVersion": "2017-04-01",
                     "name": "ResourceLock",
                     "properties": {
                       "level": "CanNotDelete",
                       "notes": "Prevent accidental deletion of resource groups"
                     }
                  }
               ]
            }
         }
      }
   }
}
}
Now let’s apply this via Azure Policy. Create a new policy definition

Select a scope, since we are going to remediate a setting, we are forced to select a subscription. As of writing, management groups don’t support remediation tasks yet. Enter your details and create a new category if you like.
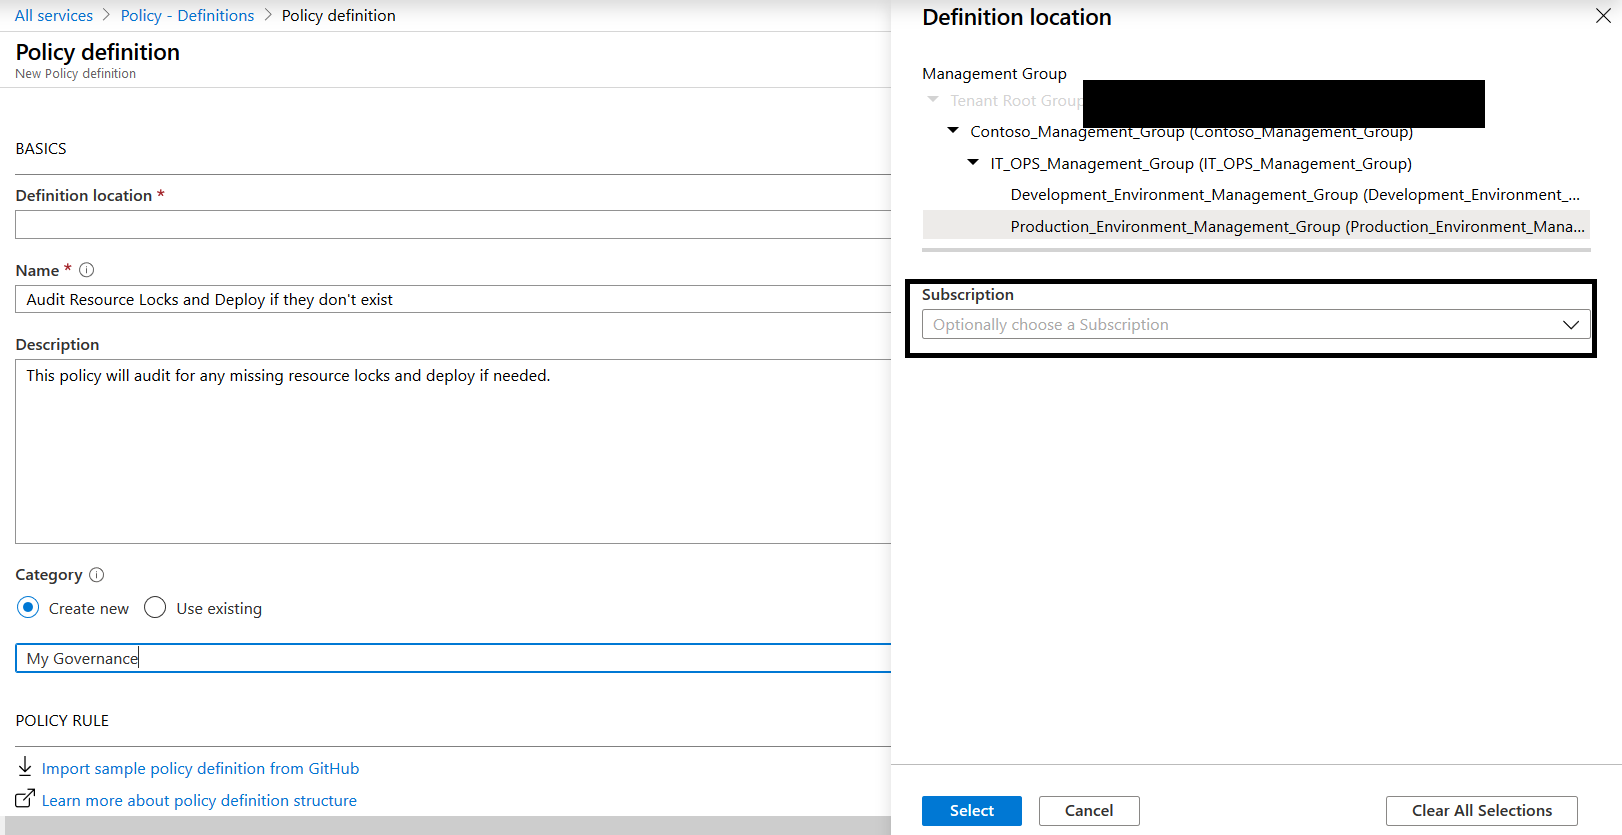
Now paste in the previous code
And here we go, we have our custom policy definition ready to be assigned.

Now navigate to policy assignments and select assign policy

Select your policy, enter a description and click next.
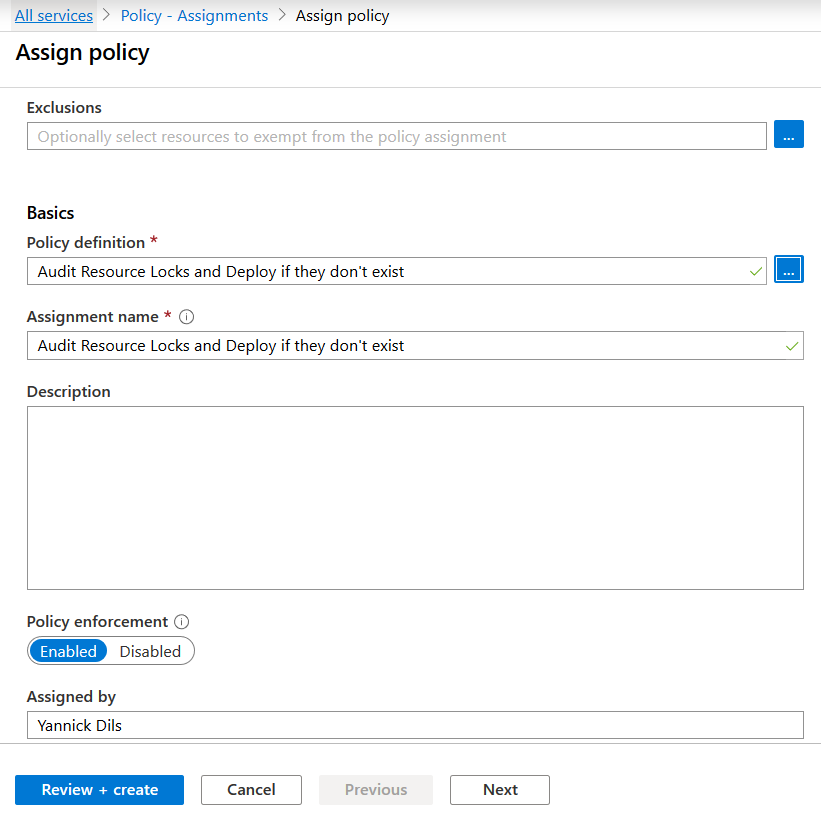
We have no parameters that need to be defined, so let’s continue.

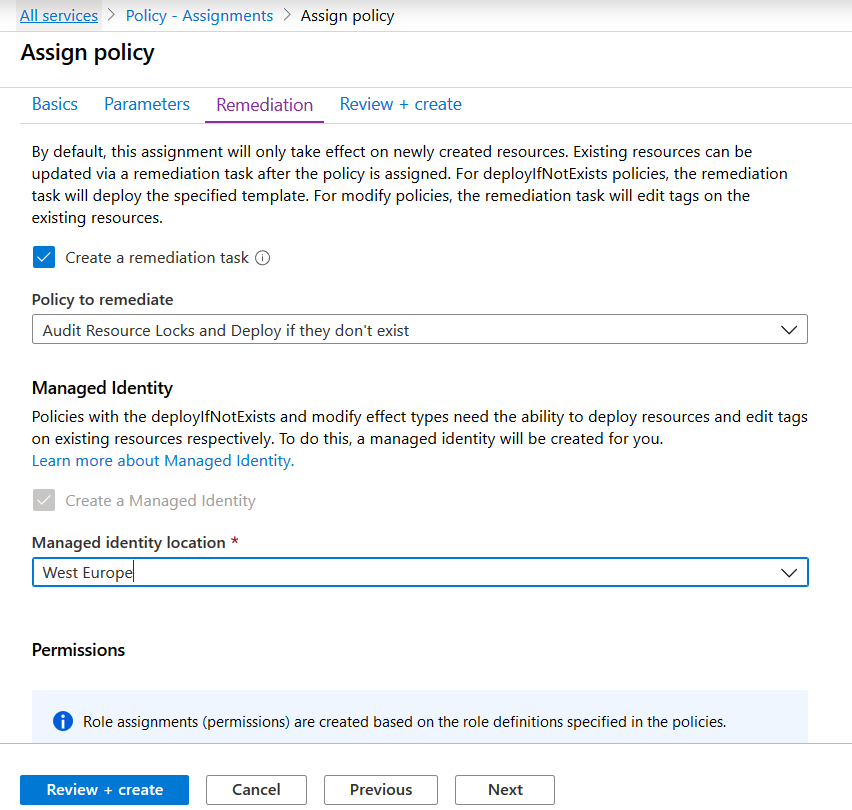
Next up, yes we would like to remediate our policy. And this requires a managed identity in order to modify our settings. When applying a remediation task via the Azure Portal, the managed identity will receive the required permissions that are required to perform it’s remediating tasks.
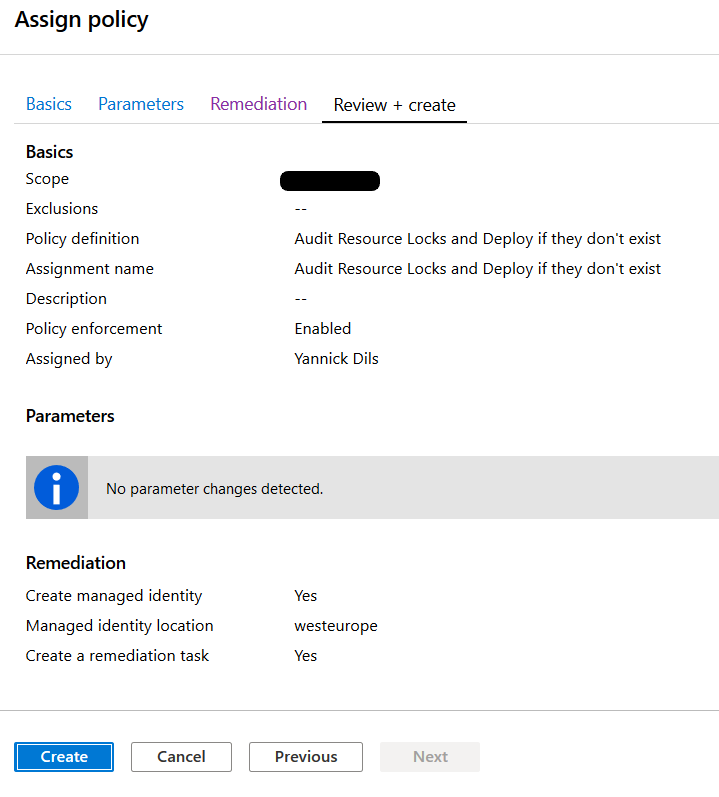
Final step, review and create!
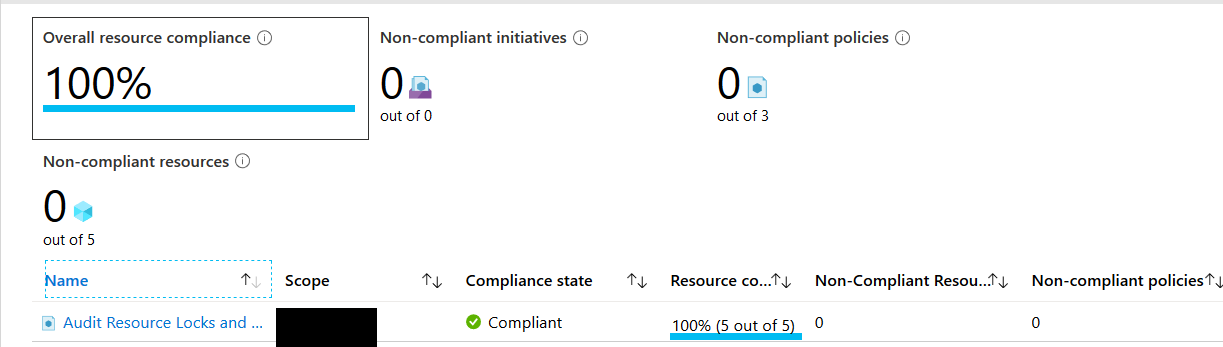
Now let’s wait for the assignment to kick in and review our compliance state.
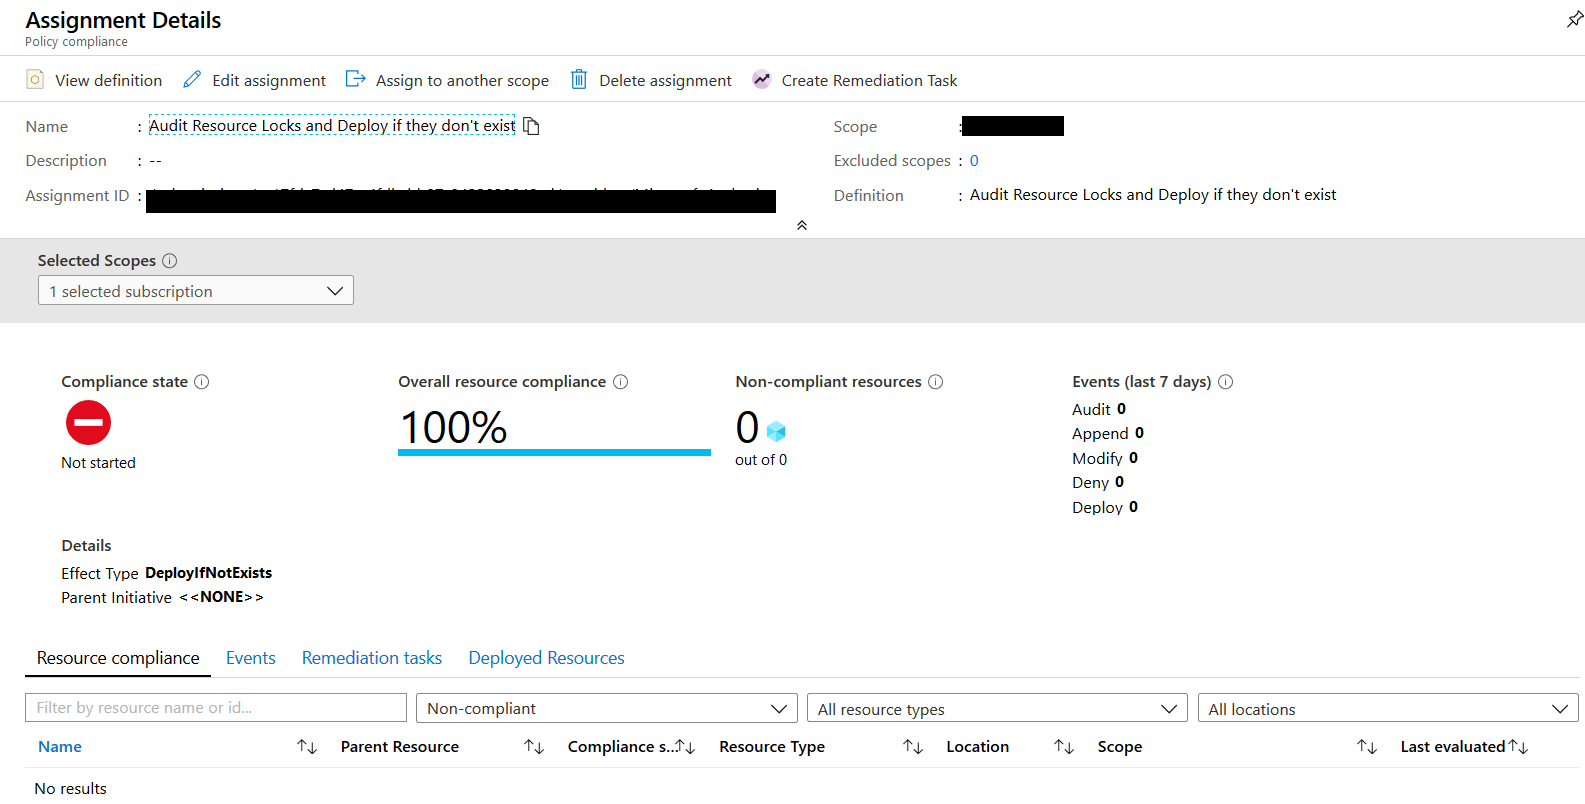
It can take up to 30 minutes before your policy is evaluated. Once the policy is evaluated you see a compliance or non-compliance report.
In this case.. all our resource groups are compliant.
Ready for TAGS
Now that we’ve seen our first policy at work, it’s time to take a look at resource tags. And how we can benefit from applying a right set of tags to our environment. The below list represents a series of tags that we commonly use in our Azure environments.
| Description | Tag Name | Values/Format |
| Cost Center | CostCenter | IT , HR, Finance, Sales, Marketing |
| Environment | Environment | PRD, ACC, TST, DEV, HUB |
| Owner | Owner | owner@company.com |
| Application | App | Public Website, Sales App, .. |
| Importance | Importance | Critical, high, medium, low |
Tags are most used in the following 2 scenario’s:
- Cost Management (Providing the ability to chargeback to a specific costcenter or owner)
- Resource navigation and automation (automating start/stop schedules by defining out of hours within tags)
Before you start applying tags, make sure to go through the supported tag mechanisms. In our next blogpost we’ll talk about resource groups and as with resource locks we’ll have a look at how we can use Azure Policy to apply tags at scale.
Summary
This blogpost sort of includes the high level steps to start of with managing your subscriptions with management groups. Applying RBAC at scale and locking down your environment with Azure Policy.
What’s next?
The following aspects of the virtual datacenter concept will be highlighted in the following upcoming posts:
- Virtual Datacenter Concept – 3 of 10 – Resource Groups
- Virtual Datacenter Concept – 4 of 10 – Virtual Networking
- Virtual Datacenter Concept – 5 of 10 – Cloud Storage
- Virtual Datacenter Concept – 6 of 10 – Identity Options
- Virtual Datacenter Concept – 7 of 10 – Log Analytics
- Virtual Datacenter Concept – 8 of 10 – Security
- Virtual Datacenter Concept – 9 of 10 – Business Continuity
- Virtual Datacenter Concept – 10 of 10 – Automation
Missed a part or want to review a previous section? Be sure to check out my previous posts:
- Virtual Datacenter Concept – Introduction
- Virtual Datacenter Concept – 1 of 10- Naming Conventions
- Virtual Datacenter Concept – 2 of 10 – Governance