
In this blog post, I want to go into more detail on how to automate the creation and management of Azure Migrate projects, including the native Azure Assessment & Azure Migration solutions.
For a long time, Azure Migrate was the ugly duck in the Azure Resource Management spectrum. Since the release of Azure Migrate v2, Microsoft has made many contributions to facilitating the assessment and onboarding process of IaaS (Infrastructure as a Service) with Azure Migrate.
Like any other resource on Azure, we would like to standardize and make sure we can provide some CI/CD into our deployment process. This counts for “Azure Migrate” as a solution as well.
PowerShell Module Az.Migrate
There is currently not much documentation available on how to automate the creation of Azure Migrate projects. Looking at the current Powershell modules, we could use a couple of things for scripting some actions. However, since these Powershell modules are fairly new, there are some feature requests that could be introduced to expand the deployment and management scope of the Az.Migrate module.
Link to Az.Migrate reference guide.
ARM
Our other option is using ARM templates in combination with PowerShell to deploy, manage and scale our Azure Migrate projects.
Link to ARM template reference guide.
Use case
We will be deploying the Azure Native Assessment & Migration solution for a VMware Agentless migration scenario in our use case.
Under the hood vs Portal Deployment
Before adding solutions to an Azure Migrate project, we actually need to create a new project. Let’s first have a look at how this is done via the Azure Portal.

The “Click here” link allows you to enter your resource group, project name, and metadata location. See screenshot below.

The Azure Migrate project will use and deploy the following solutions:
- Servers-Migration-ServerMigration
- Servers-Assessment-ServerAssessment
- Servers-Discovery-ServerDiscovery
When deploying the native solutions via the Azure Portal, it’s only a few clicks to add the tools to your project. See screenshots below.
Adding an assessment & migration tool
Update! During the process of writing this blog post, Microsoft made some deployment changes to Azure Migrate, and upon creating a new Azure Migrate project. The native Assessment & Migration tools are added by default to your Azure Migrate Project.

The following deployment details indicate that it is now enabling the tools by default.
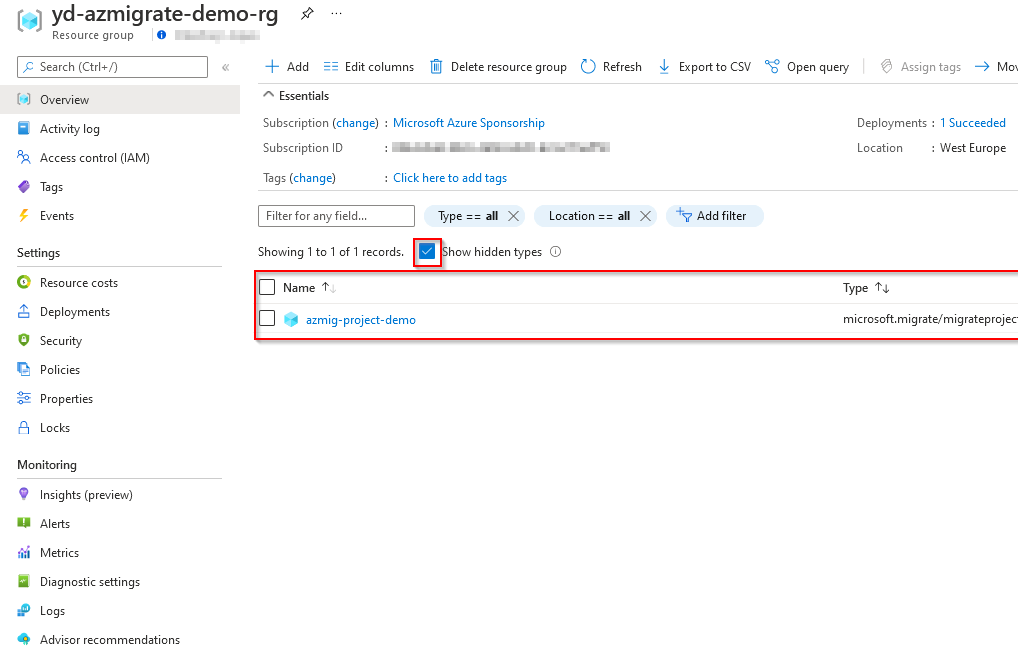
Now that our initial project resources have been deployed let’s look at the resource group and see what kind of resources are deployed.
At first sight, no resources have been deployed.
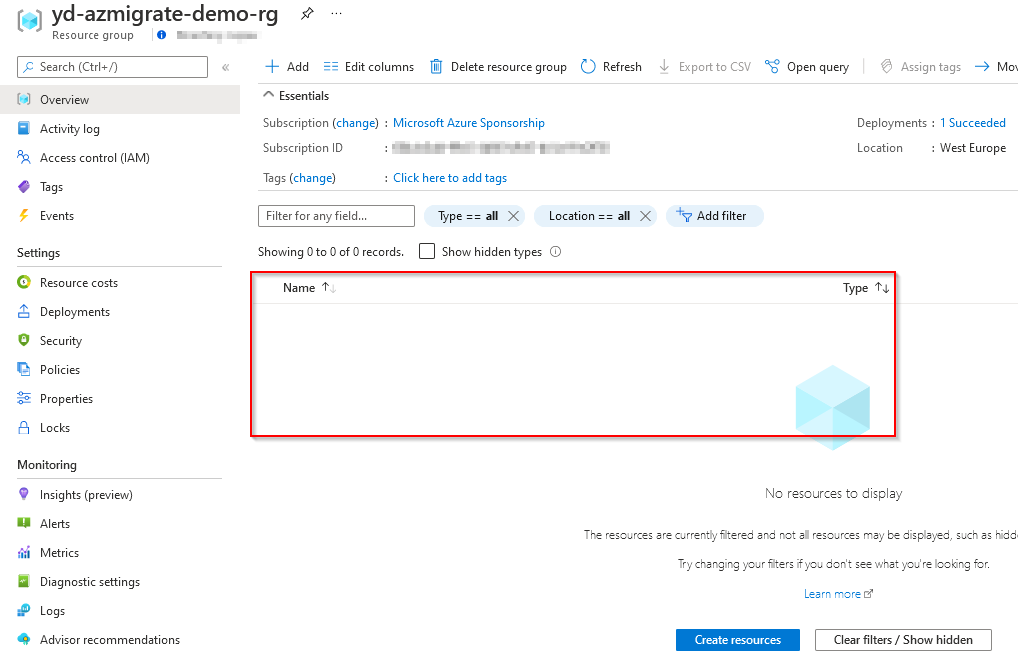
However, if you select “Show hidden types” you’ll see that your Azure Migrate project has been deployed.
Adding an Azure Migrate Appliance
The next step in our onboarding process is to add an Azure Migrate Appliance to the project. The following steps need to be performed on the Azure Portal.
In the “Assessment tools” section, click on “Discover“.

In the Discover blade, select the following options and select “Generate key“
- Discover using applianece
- Yes, with VMware vSphere Hypervisor
- Name your appliance : <appliancename>
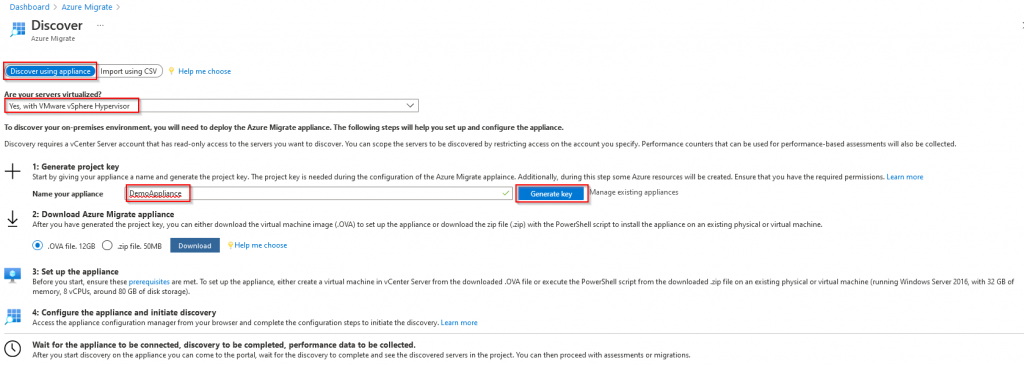
In the background, what will happen is the following. A new resource will be created that contains your assessment data. It will deploy an Azure Keyvault & Site Recovery Services vault. Some VMware-specific resources will be created as well to be able to connect your Azure Migrate project to your on-premises Appliance. After the deployment is complete, you will receive a new project key. This key is required to register your appliance.
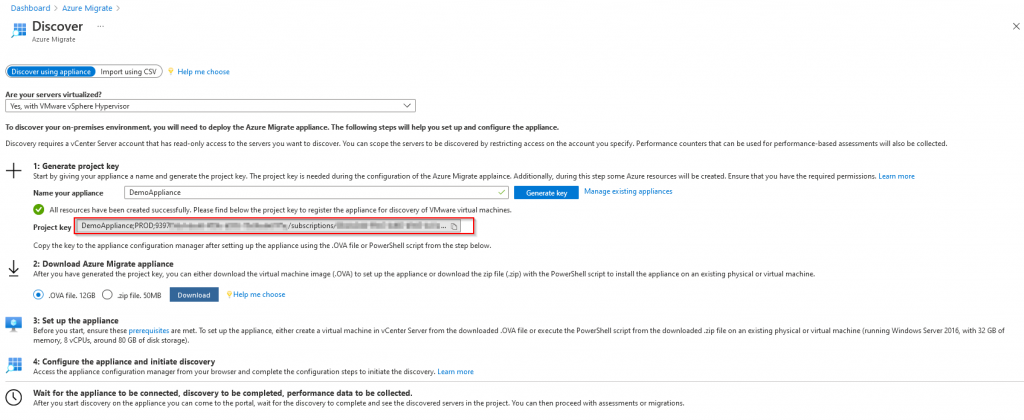
The next steps in the process would be to download the OVA or zip file and deploy it on your VMware farm. Please note to first check all prerequisites before deploying the appliance.
After the key has been generated successfully, you’ll find the following additional resources in your resource group. Please note the resource location if you have previously implemented restrictions with Azure Policy to only deploy resources in specific regions or to the same region as your resource group. You will end up having issues, as, by default, when selecting the “Europe” region, it will redirect to the “North Europe” region.

Let’s standardize & automate
Yes, it’s only a few clicks in the portal. But let’s be honest, the naming conventions aren’t perfect; I can’t choose my desired region. And I want to be able to deploy at scale or integrate this with CI/CD.
ARM to the rescue! Or not…
As a starting point, I took the deployment initialized by the portal and generalized them for re-use. After some initial struggles with the resource inheritance, I managed to script out the deployment.
The following GitHub Repo provides access to the ARM templates and script. If you clone the GitHub repo you can run the following actions in order to deploy a new Azure Migrate Project.
Link to GitHub Repo
#region variables

$location = "<location>"
$resourcegroupname = "<resource group name (existing)"
$migrationprojectname = "<projectname>"
$subscriptionid = "<subscription id>"
$tenantid = "<tenant id>"

$AzureMigrateApplianceName = $migrationprojectname + "-app"
$DeploymentName = "Deploy-" + $migrationprojectname
# Object ID of the service principal you want to give access to Azure Keyvault
$Objectid = "<object id>"

#endregion

#region Step 1 : ARM Deployment => Azure Migrate Project and Solutions

$armtemplate = Join-Path "." -ChildPath "arm" -AdditionalChildPath "azmigrate", "MigrationProject", "azuredeploy.json" | Get-Item
$armtemplateparameter = Join-Path "." -ChildPath "arm" -AdditionalChildPath "azmigrate", "MigrationProject", "azuredeploy.parameters.json" | Get-Item

$armparamobject = Get-Content $armtemplateparameter.FullName | ConvertFrom-Json -AsHashtable
$armparamobject.parameters.AzMigrateProjectName.value = $migrationprojectname
$armparamobject.parameters.Location.value = $location

$parameterobject = @{ }
$armparamobject.parameters.keys | ForEach-Object { $parameterobject[$_] = $armparamobject.parameters[$_]['value'] }

$Deploy_AzureMigrateMigration = New-AzResourceGroupDeployment -ResourceGroupName $resourcegroupname -Name "$($DeploymentName)" -TemplateFile $armtemplate.FullName -TemplateParameterObject $parameterobject

#endregion

#region Step 2 : ARM Deployment => Migration Appliance

$ResourceID = Get-AzResource -Name $migrationprojectname

$armtemplate = Join-Path "." -ChildPath "arm" -AdditionalChildPath "azmigrate", "MigrationAppliance", "azuredeploy.json" | Get-Item
$armtemplateparameter = Join-Path "." -ChildPath "arm" -AdditionalChildPath "azmigrate", "MigrationAppliance", "azuredeploy.parameters.json" | Get-Item

$armparamobject = Get-Content $armtemplateparameter.FullName | ConvertFrom-Json -AsHashtable
$armparamobject.parameters.AzMigrateProjectName.value = $migrationprojectname
$armparamobject.parameters.AzMigrateProjectResourceID.value = $ResourceID.ResourceId
$armparamobject.parameters.AzMigrateProjectApplianceName.value = $AzureMigrateApplianceName
$armparamobject.parameters.location.value = $location
$armparamobject.parameters.TenantID.value = $tenantid
$armparamobject.parameters.AccessPolicyObjectID.value = $Objectid

$parameterobject = @{ }
$armparamobject.parameters.keys | ForEach-Object { $parameterobject[$_] = $armparamobject.parameters[$_]['value'] }

$Deploy_AzureMigrate = New-AzResourceGroupDeployment -ResourceGroupName $resourcegroupname -Name "$($DeploymentName)-appliance" -TemplateFile $armtemplate.FullName -TemplateParameterObject $parameterobject
#endregion

#region Step 3 : Connect Migration Appliance with Migration Project

$AssessmentProjectResourceID = Get-AzResource -Name "$($AzureMigrateApplianceName)-project"
$RsvResourceID = Get-AzResource -Name "$($AzureMigrateApplianceName)-rsv"
$SiteID = Get-AzResource -Name "$($AzureMigrateApplianceName)-site"
$MasterSiteID = Get-AzResource -Name "$($AzureMigrateApplianceName)-mastersite"
$KeyVaultID = Get-AzResource -Name "$($migrationprojectname)-kv"
$objectid = "12e1575c-53f7-401b-a886-1eed1e17cd0b"
$ResourceID = Get-AzResource -Name $migrationprojectname
$SQLSiteName = "$($migrationprojectname)-mastersite/$($migrationprojectname)-sqlsites"

$armtemplate = Join-Path "." -ChildPath "arm" -AdditionalChildPath "azmigrate", "MigrationConnect", "azuredeploy.json" | Get-Item
$armtemplateparameter = Join-Path "." -ChildPath "arm" -AdditionalChildPath "azmigrate", "MigrationConnect", "azuredeploy.parameters.json" | Get-Item

$armparamobject = Get-Content $armtemplateparameter.FullName | ConvertFrom-Json -AsHashtable
$armparamobject.parameters.AzMigrateProjectName.value = $migrationprojectname
$armparamobject.parameters.Location.value = $location
$armparamobject.parameters.AzMigrateApplianceName.value = $AzureMigrateApplianceName
$armparamobject.parameters.KeyVaultName.value = $KeyVaultID.Name
$armparamobject.parameters.RecoveryVaultName.value = $RsvResourceID.Name
$armparamobject.parameters.Keyvault_ResourceID.value = $KeyVaultID.ResourceId
$armparamobject.parameters.SQLSiteName.value = $SQLSiteName
$armparamobject.parameters.MigrateProjects_ResourceID.value = $ResourceID.ResourceId
$armparamobject.parameters.VMWareSite_MigrateProjects_ResourceID.value =$SiteID.ResourceId
$armparamobject.parameters.assessmentprojects_MigrateProjects_ResourceID.value = $AssessmentProjectResourceID.ResourceId
$armparamobject.parameters.MasterSites_MigrateProjects_ResourceID.value = $MasterSiteID.ResourceId
$armparamobject.parameters.Recoveryvaults_ResourceID.value = $RsvResourceID.ResourceId

$parameterobject = @{ }
$armparamobject.parameters.keys | ForEach-Object { $parameterobject[$_] = $armparamobject.parameters[$_]['value'] }

$Deploy_AzureMigrate = New-AzResourceGroupDeployment -ResourceGroupName $resourcegroupname -Name "$($DeploymentName)-applianceconnect" -TemplateFile $armtemplate.FullName -TemplateParameterObject $parameterobject

#endregion
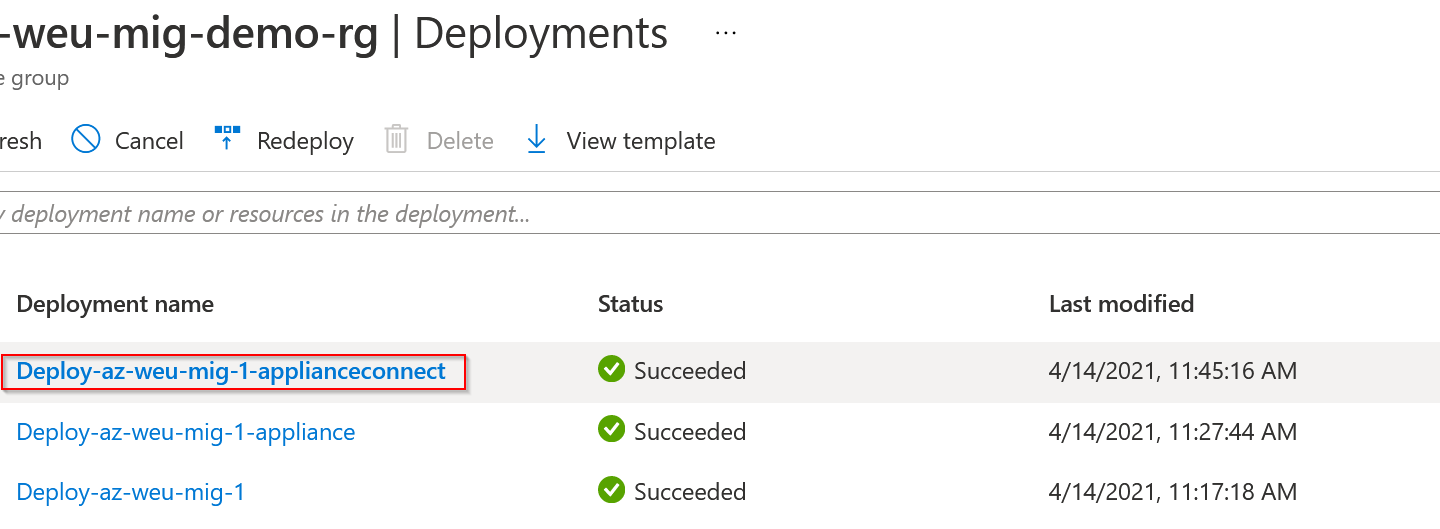
After deploying the first two regions of the script, you will see the following deployments in your resource groups.

Looking at the actual resources, we now have our resources deployed with a standardized naming convention and in the region of our choice.

The last region will link the Azure Migrate Appliance to the Azure Migrate project. At this point, it isn’t linked yet to the project.

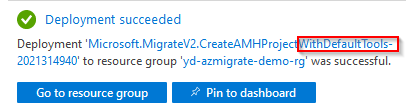
Once the final region deployment is complete, the deployment will be marked as completed.

The Azure Migrate Appliance can now be managed from within the portal.

If you click on “Manage existing appliances” you will see the newly deployed appliance.

At the end of our deployments we have a ready to go Azure Migrate Project, next steps is to deploy your On-premises Azure Migrate appliance and start assessing & migrating.
Warning!
The scripts are provided as-is. Please be very careful and test run the scripts on a “test” environment or an environment that allows you to perform some quick checks and tests. You might have to re-run the ARM template deployment due to resource provisioning not being completed yet.
Thank you!
Thank you for reading through this blog post. I hope I have been able to assist automating the onboarding of your Azure Migrate projects.
If you encounter any new insights, feel free to drop me a comment or contact me via mail or other social media channels
1 Comment on “How to standardize and automate your Azure Migrate project(s)”