

During the lifecycle of an Azure IaaS migration project with Azure Migrate, it is advised to perform some additional cleanup actions once you have migrated a certain set of virtual machines.
The migration process
The following migration process is usually followed when migrating VMWare VM’s to Azure IaaS VM’s with Azure Migrate.
- Deploy Azure Migrate appliance
- Run Discovery Assessment
- Verify Application Dependency
- Create server migration groups
- Start replication with associated replication parameters
- Perform test migration
- Cleanup test migration
- Perform final migration
- Cleanup obsolete ASR disks!
Step 5 demystified – start replication
Starting as of step 5, the Azure Migrate appliance will be using Azure Site Recovery to start replicating your on-premises VMDK (virtual disk) files to the Subscription & Resource Group that you have selected in the migration settings.
As you can see, a specific naming convention is applied by default to the ASR disks.
asrseeddisk-(VMName)-GUID
Step 6 demystified – run test migration
Once the initial delta sync of your virtual machine has been completed, you are now able to perform a test migration.
There are multiple reasons why you should perform a test migration, a major one is to find out if your server and corresponding applications are working properly in Azure.
During the test migration, a snapshot is taken of the ASR disks and a new virtual machine is being created based upon your migration settings.
Please note that your VM is being created with a “test” suffix, to indicate that this machine is being “test migrated”.
The virtual disk names can be altered in the migration settings pane, however, it is advised to keep the disk names as is, to avoid any confusion.
At this point, you will have 3 replica sets of your virtual machine disks.
- The source on-premises VMDK files
- The replication Azure Site Recovery disks
- The target Azure Virtual Machine disks
Step 7 demystified – clean up test migration
Once you’ve confirmed that your virtual machine is Azure capable and corresponds to your needs, you can clean up the test migration.
Before cleaning up the test migration, make sure that you have documented or automated the steps that you have performed on this virtual machine. All changes made on the “test migration” Virtual Machine will be lost.
When performing a clean up of the test migration, the virtual machine and corresponding managed disks are being deleted.
Step 8 demystified – Perform final migration
During the final migration step, a final sync of the on-premises virtual machine will be made.
It is advised to mark the “shutdown local machine” option when performing the migration, this ensures that no data is being altered on the machine which is being migrated
Like the test migration step, a new virtual machine is being created based on a snapshot of the latest version of the ASR disks. Once the migration has been completed. Make sure to validate the server en perform the necessary actions that you have performed during the test migration.
Your new virtual machine name will now have the exact naming convention as your on-premises virtual machine, including the attached virtual disks.
Step 9 demystified – Clean up ASR disks
When looking at your Azure Migrate project, you will find a mix of servers that have been migrated and/or are pending a test migration or clean up.

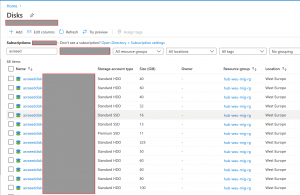
When browsing to your VM in Azure Migrate, select disks. Note down the replica disk names, these are the replica disks that are still stored as a managed disk within your target resource group.

To clean up the ASR disks, make sure to stop the replication as soon as your migration has been completed.

After having stopped the replication, the managed disks are deleted from your resource group.
Automation Script
Below script can be used in order to automate the clean up of migrated virtual machines.
#Migration Project Input Variables
$AzMigrateProjectName = "project name here"
$AzMigrateSubscriptionID = "subscription id here"
$AzMigrateResourceGroupName = "resource group name here"

#Required Modules
Write-Output "Required modules loading"
#Requires -Modules @{ ModuleName="Az.Accounts"; ModuleVersion="2.2.3" }
#Requires -Modules @{ ModuleName="Az.Migrate"; ModuleVersion="0.1.1" }

Import-Module Az.Accounts
Import-Module Az.Migrate

#Account Login
Disconnect-AzAccount
Login-AzAccount

Set-AzContext -SubscriptionId $AzMigrateSubscriptionID

#Clean up
$MigrationProject = Get-AzMigrateProject -Name $AzMigrateProjectName -SubscriptionId $AzMigrateSubscriptionID -ResourceGroupName $AzMigrateResourceGroupName

$MigrationStatus = Get-AzMigrateServerReplication -ResourceGroupName $AzMigrateResourceGroupName -ProjectName $AzMigrateProjectName -SubscriptionId $AzMigrateSubscriptionID | Where-Object {$_.MigrationState -eq "MigrationSucceeded"} | select MachineName, MigrationState, AllowedOperation, Id

foreach ($migrationobject in $MigrationStatus) {
    $ObjectID = Get-AzMigrateServerReplication -TargetObjectID $migrationobject.id
    Write-host "Following replication job will be removed: " $migrationobject.MachineName -foregroundcolor green
    Remove-AzMigrateServerReplication -InputObject $ObjectID
}
Thank you!
Thank you for reading through this blog post, I hope I have been able to assist in keeping your Azure Migration journey as lean and mean as possible.
If you encounter any new insights, feel free to drop me a comment or contact me via mail or other social media channels