
A couple of days ago, Microsoft announced the public preview of Windows Server Active Directory authentication / integration for Azure Files. Make sure to check-out the introduction video by Will Gries (Senior Program Manager) and Thomas Maurer (Senior Cloud Advocate)
This is probably one of the most requested feature releases since the ability to create file shares on Azure Storage.
In the recent past, Microsoft enabled Active Directory Authentication and setting ACLs coming from their Azure AD Domain Services solution.
Now it’s time to integrate this with our existing Windows Server Active Directory Infrastructure
Long story short
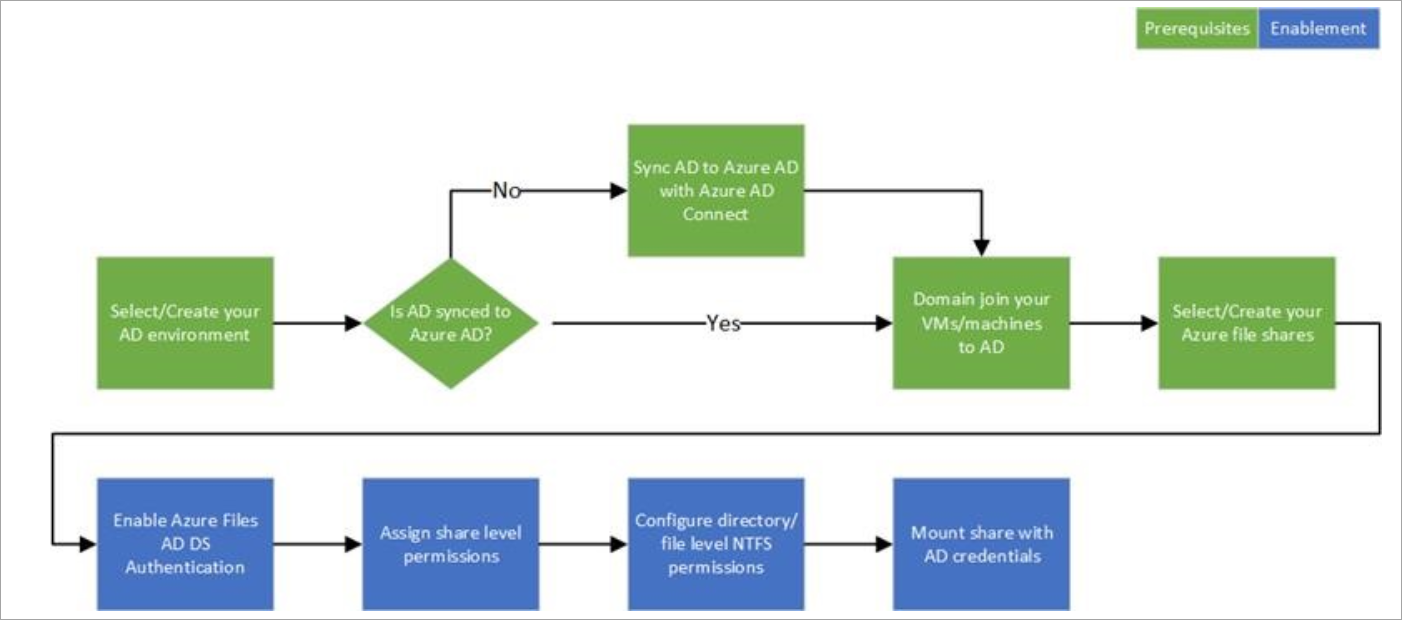
We are now able to set NTFS permissions and ACLs based on our existing Windows Server AD on an Azure Fileshare. This blogpost takes you through the necessary steps to automate the process shown below.
Now the long(er) story ?
Before we can activate all of this, we have a couple of prerequisites:
1. Windows Server Active Directory needs to be synchronized with Azure Active Directory
2. You need an Azure Storage account with an Azure File share which is NOT located in one of the following regions.
- West US
- West US 2
- East US
- East US 2
- West Europe
- North Europe
! Run the following script if you like to create a new storage account
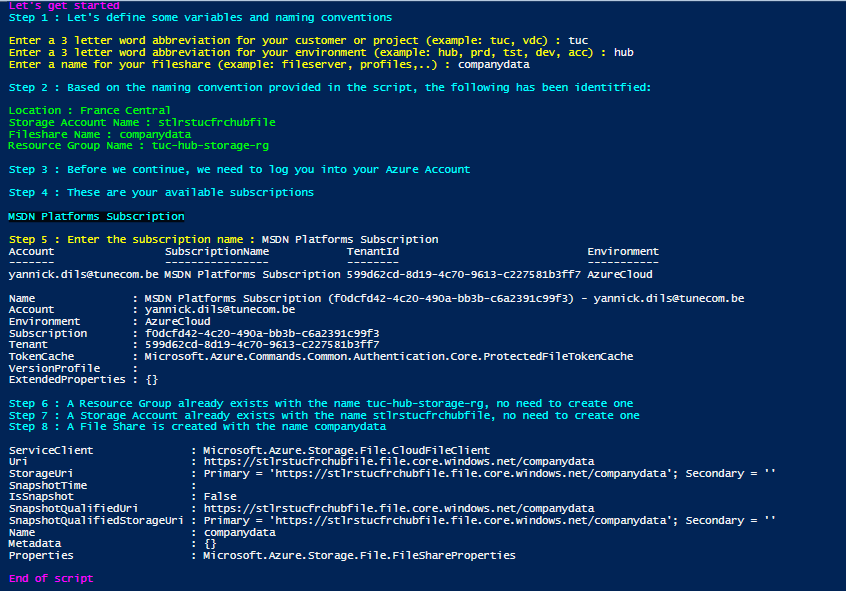
Background info: Change the initial variables to meet your environment needs, I have chosen France Central as a region to deploy our Storage Account.
Download the script here, or copy paste the scriptblock below. After running the script you’ll see that new or additional file shares have been created.

Powershell Script
########################
#
# Name: Azure Files Create Storage Account
# Author: Yannick Dils
# Version: v0.1
#
########################

Write-Host "Let's get started" -ForegroundColor Magenta
Sleep 3

########################
#
# Install or import the required modules
#
########################

start-process powershell –verb runAs -ArgumentList "Install-Module -Name Az.Accounts  -RequiredVersion 1.6.4 -Force" -WindowStyle Hidden
Import-Module Az.Accounts
start-process powershell –verb runAs -ArgumentList "Install-Module -Name Az.Resources  -RequiredVersion 1.11.0 -Force" -WindowStyle Hidden
Import-Module Az.Resources
start-process powershell –verb runAs -ArgumentList "Install-Module -Name Az.Storage  -RequiredVersion 1.11.0 -Force" -WindowStyle Hidden
Import-Module Az.Storage

########################
#
# Create Naming Convention + Location and Name Variables
#
########################

Write-Host "Step 1 : Let's define some variables and naming conventions`n" -ForegroundColor Cyan

Write-Host "Enter a 3 letter word abbreviation for your customer or project (example: tuc, vdc) : " -ForegroundColor Yellow -NoNewline
$Cus = Read-Host
Write-Host "Enter a 3 letter word abbreviation for your environment (example: hub, prd, tst, dev, acc) : " -ForegroundColor Yellow -NoNewline
$Env = Read-host
$FullLocation = "France Central"
$NamingConv = "st" + "lrs" + $Cus + "frc" + $Env + "file"
$SAFILE = $NamingConv
$RGDATA = $Cus + "-hub-storage-rg"
Write-Host "Enter a name for your fileshare (example: fileserver, profiles,..) : " -ForegroundColor Yellow -NoNewline
$FileShareName = Read-host


Write-Host "`nStep 2 : Based on the naming convention provided in the script, the following has been identitfied:`n" -ForegroundColor Cyan
Write-Host "Location : $FullLocation"  -ForegroundColor Green
Write-Host "Storage Account Name : $SAFILE" -ForegroundColor Green
Write-Host "Fileshare Name : $FileShareName" -ForegroundColor Green

Write-Host "Resource Group Name : $RGDATA" -ForegroundColor Green


########################
#
# Login to Az Account
#
########################

Write-Host "`nStep 3 : Before we continue, we need to log you into your Azure Account" -ForegroundColor Cyan

Login-AzAccount

########################
#
# Select the Azure Subscription where you want to create your storage account
#
########################

$Subscriptions = Get-AzSubscription
Write-Host "Step 4 : These are your available subscriptions`n" -ForegroundColor Cyan
Write-host $Subscriptions.Name -ForegroundColor Cyan -BackgroundColor Black

Write-Host "`nStep 5 : Enter the subscription name : " -ForegroundColor Yellow -NoNewline
$SubscriptionName = Read-host
Select-AzSubscription -Subscription $SubscriptionName


########################
#
# Verify if an existing resource group exists with the name in variable $RGDATa, create a new one if not
#
########################


$RG = Get-AzResourceGroup -Name $RGDATA -ErrorAction SilentlyContinue

If ($RG)
        {
        Write-Host "Step 6 : A Resource Group already exists with the name $RGDATA, no need to create one" -ForegroundColor Cyan
        }
Else
        {
        Write-Host "Step 6 : A Resource Group is created with the name $RGDATA" -ForegroundColor Cyan
        New-AzResourceGroup -Name $RGDATA -Location $FullLocation
        }

########################
#
# Create a new Storage Account located in the $FullLocation region based on the input variables
#
########################

$SA = Get-AzStorageAccount -ResourceGroupName $RGDATA -Name $SAFILE.ToLower() -ErrorAction SilentlyContinue
$StorageShare = Get-AzStorageShare -Name $FileShareName -Context $sa.Context -ErrorAction SilentlyContinue

If ($SA)
        {
        Write-Host "Step 7 : A Storage Account already exists with the name $SAFILE, no need to create one" -ForegroundColor Cyan

        If ($StorageShare)
                {
                Write-Host "Step 8 : A File Share already exists with the name $FileShareName, no need to create one" -ForegroundColor Cyan
                }
        Else
                {
                Write-Host "Step 8 : A File Share is created with the name $FileShareName" -ForegroundColor Cyan
                New-AzStorageShare -Name $FileShareName -Context $SA.Context
                }


        }
Else
        {
        Write-Host "Step 7 : A Storage Account is created with the name $SAFILE" -ForegroundColor Cyan
        New-AzStorageAccount -ResourceGroupName $RGDATA -Name $SAFILE.ToLower() -Kind StorageV2 -SkuName Standard_LRS -Location $FullLocation -AccessTier Hot
        Write-Host "Step 8 : A File Share is created with the name $FileShareName" -ForegroundColor Cyan
        $ctx = Get-AzStorageAccount -ResourceGroupName $RGDATa -Name $SAFILE
        New-AzStorageShare -Name $FileShareName -Context $ctx.Context

         }

Write-Host "End of script" -ForegroundColor Magenta


########################
#
# End of script
#
########################

SLeep 5
3. You need to join your Azure Storage account to the domain
Since it’s still in public preview, you need to perform a couple of manual steps in order to join your Azure Storage account to your Windows Server Active Directory Domain. Looking at Azure AD Domain Services, this is an additional switch / parameters you need to provide in order to allow Azure AD DS authentication. I assume that the product team will try to provide the same type of deployment feature with regards to joining your traditional active directory domain.
The following link provides you a step by step guide in how to perform the required steps to join your domain. So feel free to read through it. But wait!
I’ve taken the opportunity to automate the necessary steps and put it in the following script. Note: Make sure to run it from a domain joined machine or directly on your domain controller.
Download the script here, or copy paste the scriptblock below. After running the script your Azure Storage Account will be joined to the domain, this is how it could look like.

Powershell Script
########################
#
# Name: Azure Files Domain Join Script
# Author: Yannick Dils
# Version: v0.1
#
########################

Write-Host "Let's get started" -ForegroundColor Cyan
Sleep 3

########################
#
# Install or import the required modules
#
########################

start-process powershell –verb runAs -ArgumentList "Install-Module -Name Az.Accounts  -RequiredVersion 1.6.4 -Force" -WindowStyle Hidden
Import-Module Az.Accounts
start-process powershell –verb runAs -ArgumentList "Install-Module -Name Az.Resources  -RequiredVersion 1.11.0 -Force" -WindowStyle Hidden
Import-Module Az.Resources
start-process powershell –verb runAs -ArgumentList "Install-Module -Name Az.Storage  -RequiredVersion 1.11.0 -Force" -WindowStyle Hidden
Import-Module Az.Storage
start-process powershell –verb runAs -ArgumentList "Install-Module -Name ActiveDirectory -Force" -WindowStyle Hidden
Import-Module ActiveDirectory


########################
#
# Change the execution policy to unblock importing AzFilesHybrid.psm1 module
#
########################

Set-ExecutionPolicy -ExecutionPolicy Unrestricted -Scope Currentuser -Force -ErrorAction SilentlyContinue

########################
#
# Download The AzFilesHybird powershell modules
#
########################

Write-Host "Step 1 : We will now download the Azure Files Hybrid powershell modules into a C:\Temp directory" -ForegroundColor Cyan


$DownloadLink = "https://github.com/Azure-Samples/azure-files-samples/releases/download/AzFilesHybrid-0.1.0.0/AzFilesHybrid.zip"
$TempDir = "C:\Temp"
$Output = "C:\Temp\AzFilesHybrid.zip"
$Path = Test-Path $TempDir

If ($Path -eq $true)
    {
    Write-Host "Step 2 : The C:\Temp path already exists, no need to create one" -ForegroundColor Cyan
    }
Else
    {
    Write-host "Step 2 : We are creating a temp directory C:\Temp" -ForegroundColor Cyan
    $DontShow = mkdir $TempDir

    }


(New-Object System.Net.WebClient).DownloadFile($DownloadLink, $output)

########################
#
# Navigate to where AzFilesHybrid is unzipped and stored and run to copy the files into your path
#
########################

cd $TempDir
Expand-Archive -LiteralPath $Output -DestinationPath $TempDir -Force
.\CopyToPSPath.ps1

########################
#
# Import AzFilesHybrid module
#
########################


Import-Module -name AzFilesHybrid


########################
#
# Login with an Azure AD credential that has either storage account owner or contributer RBAC assignment
#
########################

Write-Host "Step 3 : Let's connect to our Azure Subscriptions" -ForegroundColor Cyan
Sleep 3
Connect-AzAccount

########################
#
# Select the Azure Subscription where your Storage Account is located
#
########################

$Subscriptions = Get-AzSubscription
Write-Host "Step 4 : These are your available subscriptions" -ForegroundColor Cyan
Write-host $Subscriptions.Name -ForegroundColor Cyan -BackgroundColor Black

Write-Host "Step 5 : Enter the subscription name : " -ForegroundColor Yellow -NoNewline
$SubscriptionName = Read-host
Select-AzSubscription -Subscription $SubscriptionName

########################
#
# Retrieve your current Windows Server Active Directory Domain Details
#
########################


$domaindetails = Get-ADDomain
#Register the target storage account with your active directory environment under the target OU
$Domain = $domaindetails.DNSRoot


########################
#
# Retrieve your Resource Groups and Storage Accounts located in your Azure Subscription
#
########################

#############
#
# Resource Groups
#
#############

$ResourceGroups = Get-AzResourceGroup | Select ResourceGroupName
Write-Host "Step 6 : These are the available resource groups: " -ForegroundColor Cyan
Foreach ($RG in $ResourceGroups)
    {
    Write-Host $RG.ResourceGroupName -ForegroundColor Cyan -BackgroundColor Black
    }
Write-Host "Step 7 : Enter the resource group name, where your Azure Files storage account is located: " -ForegroundColor Yellow -NoNewline
$ResourceGroup = Read-host

#############
#
# Storage Accounts
#
#############


$StorageAccounts = Get-AzStorageAccount -ResourceGroupName $ResourceGroup

Write-Host "Step 8 : These are the available storage accounts : " -ForegroundColor Cyan

Foreach ($SA in $StorageAccounts)
        {
        Write-Host $SA.StorageAccountName -ForegroundColor Cyan -BackgroundColor Black
        }
Write-Host "Step 9 : Enter the storage account name, where your Azure Files share is located: " -ForegroundColor Yellow -NoNewline
$StorageAccount = Read-host

########################
#
# Create or use an Organizational Unit where our Azure Files storage account will be located
#
########################
$AzureFilesOUName = "AzureFiles"

Write-Host "Step 10 : We now want to join the Azure File Storage Accounts to the domain in an OU called $AzureFilesOUName" -ForegroundColor Cyan


$OU = Get-ADOrganizationalUnit -Filter 'Name -like $AzureFilesOUName'
If ($OU)
        {Write-Host "Step 11 : The AzureFiles OU Already Exists, no need to create one" -ForegroundColor Cyan}
Else
        {
        Write-Host "Step 11 : The OU needs to be created, we will now create a new OU called $AzureFilesOUName" -ForegroundColor Cyan
        $AzureFilesOU = New-ADOrganizationalUnit -Name $AzureFilesOUName
        }

########################
#
# Join the storage account into the domain, located in the required organizational unit
#
########################

Join-AzStorageAccountForAuth -ResourceGroupName $ResourceGroup -StorageAccountName $StorageAccount -Domain $Domain -DomainAccountType ComputerAccount -OrganizationalUnitName "Servers"

########################
#
# Verify Domain Join
#
########################

$azurefiles = Get-AzStorageAccount -ResourceGroupName $ResourceGroup -Name $StorageAccount

$ADService = $azurefiles.AzureFilesIdentityBasedAuth.DirectoryServiceOptions

Write-Host "Step 12 : Let us now verify if the directory service is ok" -ForegroundColor Cyan
Sleep 5

If ($ADService -eq "AD")
        {
        Write-host "Step 13 : All OK" -ForegroundColor Green
        }
Else
        {
        Write-host "Step 13 : Something went wrong ;)" -ForegroundColor Red
        }


Write-Host "Step 14 : Let us now verify if the directory authentication is ok" -ForegroundColor Cyan
Sleep 5

$ADInfo = $azurefiles.AzureFilesIdentityBasedAuth.ActiveDirectoryProperties

If ($ADInfo.DomainName -eq $Domain)
        {
        Write-host "Step 15 : All OK" -ForegroundColor Green
        }
Else
        {
        Write-host "Step 15 : Something went wrong ;)" -ForegroundColor Red
        }

Write-host "End of script" -ForegroundColor Cyan
Sleep 5

########################
#
# End of script
#
########################
4. Assign the required roles to your security principals.
Now that we have our storage account joined to the domain. We need to assign the right set of role based access controls on the Azure File Share level.
3 built-in roles can be identified to set access to the Azure File Share:
- Storage File Data SMB Share Reader allows read access in Azure Storage file shares over SMB.
- Storage File Data SMB Share Contributor allows read, write, and delete access in Azure Storage file shares over SMB.
- Storage File Data SMB Share Elevated Contributor allows read, write, delete and modify permissions in Azure Storage file shares over SMB
The following script can assist you in setting the right set of permissions for a certain security principal. Note: The security principal must be entered in a UPN format (username@corp.something)
Download the script here, or copy paste the scriptblock below. After running the script you will be able to mount the Azure File share in the context of the security principal.

Powershell Script
########################
#
# Name: Azure Files RBAC
# Author: Yannick Dils
# Version: v0.1
#
########################


Write-Host "Let's get started" -ForegroundColor Cyan
Sleep 3

########################
#
# Set General Variables and Naming Conventions
#
########################

Write-Host "Step 1 : Let's define some variables and naming conventions" -ForegroundColor Cyan

Write-Host "Enter a 3 letter word abbreviation for your customer or project (example: tuc, vdc) : " -ForegroundColor Yellow -NoNewline
$Cus = Read-Host
Write-Host "Enter a 3 letter word abbreviation for your environment (example: hub, prd, tst, dev, acc) : " -ForegroundColor Yellow -NoNewline
$Env = Read-host
$FullLocation = "France Central"
$NamingConv = "st" + "lrs" + $Cus + "frc" + $Env + "file"
$SAFILE = $NamingConv
$RGDATA = $Cus + "-hub-storage-rg"
Write-Host "Enter a name for your fileshare (example: fileserver, profiles,..) : " -ForegroundColor Yellow -NoNewline
$FileShareName = Read-host


########################
#
# Set the names of the Azure Files Roles into Variables
#
########################

Write-Host "Step 2 : Let's store the Azure File Storage Roles into variables for later use" -ForegroundColor Cyan


$Reader = "Storage File Data SMB Share Reader" # R permissions
$Contributor = "Storage File Data SMB Share Contributor" # R W D permissions
$ElevatedContributor ="Storage File Data SMB Share Elevated Contributor" # R W D M permissions

########################
#
# Enter the specific group in UPN format and store them into variables
#
########################

Write-Host "Step 3 : Enter the security principal that needs to receive the required access controls (UPN format required):`n" -ForegroundColor Cyan
Write-Host "Read Group = Storage File Data SMB Share Reader # R permissions" -ForegroundColor Green
Write-Host "Contributor Group = Storage File Data SMB Share Contributor # R W D permissions" -ForegroundColor Green
Write-Host "ElevatedContributor = Storage File Data SMB Share Elevated Contributor # R W D M permissions`n" -ForegroundColor green

Write-Host "Enter the Reader Security Principal UPN Name : (Leave empty if not required) :" -ForegroundColor Yellow -NoNewline
$ReadGroup = Read-Host
Write-Host "Enter the Contributor Security Principal UPN name : (Leave empty if not required) :" -ForegroundColor Yellow -NoNewline
$ContributorGroup = Read-Host
Write-Host "Elevated Contributor Security Principal UPN name : (Leave empty if not required) :" -ForegroundColor Yellow -NoNewline
$ElevatedContributorGroup = Read-host

########################
#
# Set the scope onto our subscription and specific  Azure File Share
#
########################

Write-Host "`nStep 4 : Let's set our subscription scope`n" -ForegroundColor Cyan
Login-AzAccount
$Subscriptions = Get-AzSubscription
Write-Host "Step 5 : These are your available subscriptions`n" -ForegroundColor Cyan
Write-host $Subscriptions.Name -ForegroundColor Cyan -BackgroundColor Black

Write-Host "`nStep 6 : Enter the subscription name : " -ForegroundColor Yellow -NoNewline
$SubscriptionName = Read-host
Select-AzSubscription -Subscription $SubscriptionName
$Subscription = Get-AzSubscription -SubscriptionName $SubscriptionName

$SubScriptionID = $Subscription.SubscriptionId


$scope = "/subscriptions/$subscriptionID/resourceGroups/$RGDATA/providers/Microsoft.Storage/storageAccounts/$SAFILE/fileServices/default/fileshares/$fileShareName"

########################
#
# Let's assign the role to the specified security principal and scope
#
########################

##########
#
#  Reader Group
#
##########

If($ReadGroup -eq "")
        {
        Write-Host "You haven't entered any Reader Group, we will skip this role assignment for now" -ForegroundColor Yellow
        }
else
        {
        Write-Host "We are now verifying the  Reader Group role assignment for Security Principal $ReadGroup" -ForegroundColor Cyan
        $RoleAssignment = Get-AzRoleAssignment -SignInName $ReadGroup -RoleDefinitionName $Reader -Scope $scope -ErrorAction SilentlyContinue

        If ($RoleAssignment)
                {
                Write-host "The role assignment already exists, we don't need to add the specific assignment" -ForegroundColor Cyan
                }
        else
                {
                Write-Host "The role assignment is being created" -ForegroundColor Cyan
                New-AzRoleAssignment -SignInName $ReadGroup -RoleDefinitionName $Reader -Scope $scope
                }

        }


##########
#
#  Contributor Group
#
##########


If($ContributorGroup -eq "")
        {
        Write-Host "You haven't entered any Contributor Group, we will skip this role assignment for now" -ForegroundColor Yellow
        }
else
        {
        Write-Host "We are now verifying the  Contributor Group role assignment for Security Principal $ContributorGroup" -ForegroundColor Cyan
        $RoleAssignment = Get-AzRoleAssignment -SignInName $ContributorGroup -RoleDefinitionName $Contributor -Scope $scope -ErrorAction SilentlyContinue

        If ($RoleAssignment)
                {
                Write-host "The role assignment already exists, we don't need to add the specific assignment" -ForegroundColor Cyan
                }
        else
                {
                Write-Host "The role assignment is being created" -ForegroundColor Cyan
                New-AzRoleAssignment -SignInName $ContributorGroup -RoleDefinitionName $Contributor -Scope $scope
                }

        }


##########
#
# Elevated Contributor Group
#
##########

If($ElevatedContributorGroup -eq "")
        {
        Write-Host "You haven't entered any Elevated Contributor Group, we will skip this role assignment for now" -ForegroundColor Yellow
        }
else
        {
        Write-Host "We are now verifying the Elevated Contributor Group role assignment for Security Principal $ElevatedContributorGroup" -ForegroundColor Cyan
        $RoleAssignment = Get-AzRoleAssignment -SignInName $ElevatedContributorGroup -RoleDefinitionName $ElevatedContributor -Scope $scope -ErrorAction SilentlyContinue

        If ($RoleAssignment)
                {
                Write-host "The role assignment already exists, we don't need to add the specific assignment" -ForegroundColor Cyan
                }
        else
                {
                Write-Host "The role assignment is being created" -ForegroundColor Cyan
                New-AzRoleAssignment -SignInName $ElevatedContributorGroup -RoleDefinitionName $ElevatedContributor -Scope $scope
                }

        }


   #Get-AzRoleAssignment -scope $scope

   Write-Host "`nEnd of Script" -ForegroundColor Cyan

   Sleep 5
5. Mount the Azure File Share with elevated privileges and start configuring NTFS permissions.
In the previous section we’ve set the share level permissions, as with traditional file server installations or implementations, we would set an additional layer of security, called NTFS permissions.
By mounting the Azure File share together with storage access key you we are elevating our privileges, allowing us to set fine grained ACLs.

The following script will automatically mount the drive-letter you choose based on the Access Keys of your storage account
Download the script here or copy the scriptblock below.
Powershell Script
########################
#
# Name: Mount Azure File Share
# Author: Yannick Dils
# Version: v0.1
#
########################

Write-Host "Let's get started" -ForegroundColor Cyan
Sleep 3

########################
#
# Create Naming Convention + Location and Name Variables
#
########################


Write-Host "Step 1 : Let's define some variables and naming conventions`n" -ForegroundColor Cyan

Write-Host "Enter a 3 letter word abbreviation for your customer or project (example: tuc, vdc) : " -ForegroundColor Yellow -NoNewline
$Cus = Read-Host
Write-Host "Enter a 3 letter word abbreviation for your environment (example: hub, prd, tst, dev, acc) : " -ForegroundColor Yellow -NoNewline
$Env = Read-host
$FullLocation = "France Central"
$NamingConv = "st" + "lrs" + $Cus + "frc" + $Env + "file"
$SAFILE = $NamingConv
$RGDATA = $Cus + "-hub-storage-rg"
Write-Host "Enter a name for your fileshare (example: fileserver, profiles,..) : " -ForegroundColor Yellow -NoNewline
$FileShareName = Read-host
Write-Host "Enter a driveletter for your fileshare (example: F, G, P..) : " -ForegroundColor Yellow -NoNewline
$DriveLetter = Read-Host


########################
#
# Login with an Azure AD credential that has either storage account owner or contributer RBAC assignment
#
########################

Write-Host "Step 2 : Let's connect to our Azure Subscriptions" -ForegroundColor Cyan
Sleep 3
Connect-AzAccount

########################
#
# Select the Azure Subscription where your Storage Account is located
#
########################

$Subscriptions = Get-AzSubscription
Write-Host "Step 3 : These are your available subscriptions" -ForegroundColor Cyan
Write-host $Subscriptions.Name -ForegroundColor Cyan -BackgroundColor Black

Write-Host "`nEnter the subscription name : " -ForegroundColor Yellow -NoNewline
$SubscriptionName = Read-host
Select-AzSubscription -Subscription $SubscriptionName

########################
#
# Retrieve the Storage Account Details and Access Tokens
#
########################

Write-Host "Step 4 : We are now retrieving the storage account details and access tokens" -ForegroundColor Cyan

$storageAccount = Get-AzStorageAccount -ResourceGroupName $RGDATA -Name $SAFILE
$storageAccountKeys = Get-AzStorageAccountKey -ResourceGroupName $RGDATA -Name $SAFILE

########################
#
# Retrieve the FileShare Details
#
########################

Write-Host "Step 5 : We are now retrieving the file share details" -ForegroundColor Cyan


$fileShare = Get-AzStorageShare -Context $storageAccount.Context | Where-Object {
    $_.Name -eq $fileShareName -and $_.IsSnapshot -eq $false
}

if ($fileShare -eq $null) {
    throw [System.Exception]::new("Azure file share not found")
}

########################
#
# Mount the Azure File Storage
#
########################

Write-Host "Step 6 : Your file share is being mounted" -ForegroundColor Cyan


$password = ConvertTo-SecureString -String $storageAccountKeys[0].Value -AsPlainText -Force
$credential = New-Object System.Management.Automation.PSCredential -ArgumentList "AZURE\$($storageAccount.StorageAccountName)", $password
New-PSDrive -Name $DriveLetter -PSProvider FileSystem -Root "\\$($fileShare.StorageUri.PrimaryUri.Host)\$($fileShare.Name)" -Credential $credential -Persist

Write-Host "Step 7 : Let's open up our file share in an explorer window" -ForegroundColor Cyan

$path = $DriveLetter + ":\"
Invoke-Item $path

Write-Host "`nEnd of script" -ForegroundColor Cyan
Sleep 5

########################
#
# End of script
#
########################
6. Next Steps
Next steps could be defined as the following
- Configure a private endpoint on the storage account to secure connectivity within your virtual networks
- Setup Azure Filesync to start migrating your data
- Create a new DFS namespace to allow easier translation of common names
Feel free to comment or provide additional insights on the scripts and documentation provided.